
One of the most exciting aspects of my journey with food, nutrition and cooking in the past year has been home-making the basics: pantry staples that are so simple (and so much healthier) to create at home, but which I--like most others--had never considered could come from anywhere but the grocery store shelves. I previously wrote about the overwhelming excitement and empowerment I felt the very first time I made nut butter from scratch. The same is true of granola, salad dressings, sauces, and my latest love, homemade almond milk. Choosing to tackle these gastronomic fundamentals in the kitchen rather than reaching for the (arguably more convenient) ready-made jar offers so many benefits, most exciting of which are heightened nutrition, direct agency, and boundless possibilities for creativity!

One of the most important aspects for me of homemaking pantry staples is that it grants me complete control over the freshness, type and quality of the ingredients I put into my body--not to mention eliminates my consumption of bizarro additives, unnecessary quantities of sugar, and unnatural preservatives. Granola made with 'sugar', 'glucose syrup' and 'vegetable oil' immediately following 'oats'? No thanks, I'll make my own with cold-pressed olive oil and 100% pure maple syrup. Salsa that has been sitting in a container in a factory/on a plane/in a truck/on a shop shelf for who knows how long? Nah, I'll whip some up that's truly salsa fresca. By operating in this way, I am also voting with my dollars to support the foods that are real and whole rather than the processed food-like-substances (and the companies that produce them) which have overtaken our grocery baskets, our mainstream contemporary food culture, and our bodies. It is truly so refreshing and empowering; I cannot encourage you enough to start the same process, if you haven't already.
In addition to the invaluable benefits of treating our bodies well and developing closer and more meaningful relationships with our food, homemaking pantry staples provides countless opportunities for creativity! Food in its most whole and individual forms is like an artist's palate, offering so many flavors, textures and colors with which to play. Oils and vinegars, nuts and seeds, fruit and veg, herbs and spices...oh the joy! The experimentation! The possibility!

Ultimately, this ode to making the basics brings us to a very important place: Mexican food. When a good friend and I decided to host an enchilada dinner party a few weeks ago, using store bought enchilada sauce simply wasn't an option. We found an intriguing recipe, set out to the market (with our admittedly lengthy ingredients list), and tackled the enchiladas head on. The sauce? Silence-inducing. For the first few bites, we spoke only through full mouths and shocked stares. It was that good.
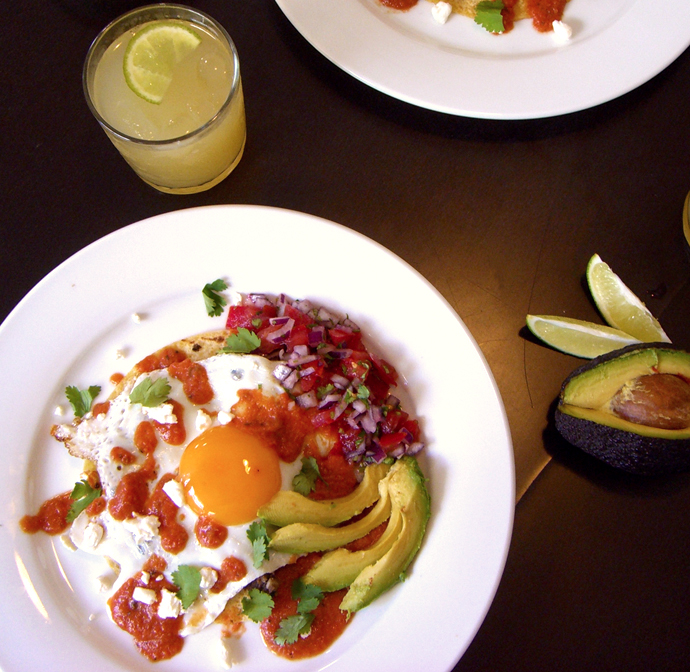
This recipe for huevos rancheros could be 'lunch in 15 minutes', but it's not. I could easily list the ingredients as 'salsa', 'refried beans' and 'enchilada sauce', all of which you could effortlessly find readymade for you in jars at the market, but I don't. Because, in addition to all the reasons I discussed above, the bold, fresh and incredible flavors that this recipe delivers are the product of making each of these elements from scratch.* Yes, these huevos rancheros are a bit of a labor of love. But let me tell you, they taste amazing for it! Also, the most labor-intensive element of this process--the ranchero sauce--freezes incredibly well. Make a big batch and you'll have it on hand for your next Mexican craving, whether that's summertime enchiladas to feed a crowd or a quick weeknight burrito bowl for one.
*After all this proselytizing, I feel it is important to acknowledge that I did use store bought tortillas, canned black beans for the refried beans, and canned tomatoes for the ranchero sauce. I definitely intend to give homemade tortillas a try next time, and I encourage you to do so if you have time! Ditto for cooking the beans from dried. But let's be real, the rest of this takes ample time. Do what you can. Any percentage of homemade goods is better than none at all!

Huevos Rancheros
Serves two, with leftover sauce
Ingredients
2 corn tortillas (look for proper no-additives tortillas, made with masa, water and salt)
2 eggs
olive oil or coconut oil for frying
Ranchero Sauce, minimally adapted from The Faux Martha
(I came across this sauce when making these undeniably delicious enchiladas from Sprouted Kitchen. The sauce is flawless; a total keeper!)
25 oz. chopped tomatoes, canned
1 yellow onion, sliced
1 garlic clove
1/2 - 1 jalapeno, deseeded and sliced
3/4 tsp. chili powder
3/4 tsp. cumin
1/2 tsp. oregano
1/4 tsp. thyme
2 Tbsp. fresh cilantro
2 Tbsp. white wine vinegar
3/4 cup vegetable broth
1/4 cup sour cream or plain greek yogurt
sea salt and ground pepper, to taste
pinch muscovado sugar
Refried Beans
1 15-oz can black beans, drained and rinsed
2/3 red onion
1 garlic clove, minced
1 Tbsp. coconut oil (or preferred cooking oil)
1 1/2 tsp. paprika
1 tsp. cumin
chili flakes (optional, to taste)
pinch sea salt (if beans were not in salted water)
Salsa Fresca (Pico de Gallo)
3 tomatoes, medium sized and ripe but firm
1/3 red onion
2 Tbsp. cilantro, chopped (leaves + stems!)
1 lime
pinch sea salt
Garnish
1/2 avocado, sliced
crumbly cheese (preferably cotija or queso fresco; goat cheese is a good substitute if Mexican cheeses are inaccessible)
cilantro
sea salt + freshly cracked black pepper
Directions
Ranchero Sauce
(If easier, this can be made a few days in advance and refrigerated or defrosted from frozen.)
1. Mix all ingredients in a blender until smooth.
2. Transfer to a saucepan and simmer until warm and thickened, about 10 minutes, stirring occasionally.
Salsa Fresca (Pico de Gallo)
1. Chop tomatoes into 1/2" (1cm) cubes, discarding the seeds and juices.
2. Dice red onion into small cubes. Set aside 2/3 for the refried beans.
2. Mix tomatoes in a bowl with the leftover 1/3 diced onion and chopped cilantro.
3. Squeeze in juice of 1/2 a lime. Add a pinch of salt. Stir.
4. Adjust flavors to taste. Set aside.
Refried Beans
2. In a medium saucepan, heat 1 Tbsp. coconut oil. Add the remaining 2/3 chopped onion and sauté until beginning to turn translucent, about 3 minutes. Add minced garlic and cook for another minute.
3. Stir in paprika, cumin and chili flakes, if using. Cook for a minute. Add a splash of water to deglaze the pot if the spices are sticking.
4. Add the black beans and stir until covered by onions, garlic and spices. Let cook for a few minutes to heat up and absorb the flavors.
5. Occasionally stir and mash up the beans, turning them into a bit of a paste with larger chunky bits. Add splashes of water in small increments if the beans begin to get dry.
6. Adjust seasoning to taste. Turn off heat when happy with taste and texture.
Eggs and Tortillas
1. If your tortillas are burrito-sized, cut them down to taco size using a small plate as a guide.
2-A. If you have a gas stove, turn heat on low and place tortillas directly over the flame to heat. Keep an eye on them so they don't burn, moving them around and flipping over for an even char. Don't let them get crispy! Put on plate.
2-B. If you have an electric stove, heat tortillas in a dry skillet on the stove until warm and slightly browned but still soft. Put on plate.
3. In a small frying pan over a medium heat, heat a splash of oil (or butter, if you prefer). Crack one egg directly into the pan. Let cook uninterrupted until the white has turned opaque and the edges get a bit crispy. Repeat with second egg.
Assembling the Huevos Rancheros
1. While the eggs are cooking, pile hot refried beans on top of the tortillas.
2. Place fried eggs on top of refried beans. Spoon salsa onto each plate next to the egg. Add slices of avocado and a generous sprinkle of crumbly cheese. Drizzle desired amount of ranchero sauce over everything.
3. Top off with sea salt, freshly cracked black pepper, and cilantro leaves.


